Your First Git repo
Git State
See default lists
#local
git config --list

#global
git config --global --list
We have to add the most important config item
git config --add --global user.name "digi-anuragk"
git config --add --global user.email "anurag.kanwar@digital.ai"
These are basic git properties we have to add in order to able to perform actions from cli
Creating a new repo
The very first step of any project is to create a repo. To create a repo we use
git init
it will create a new .git folder inside directory.
Create a new git repo at /path/to/new/first-git-repo. Replace /path/to/new to your preferred project location.
The Files Are In the Git Repo
Every git repo comes with a directory that contains all of the state of the git repo. This repo is found in .git
The Basics
The next couple commands will be 80% of the commands you will execute when using git. 80% of git is exceptionally easy. Its the 20% that can get you into trouble 🫡
Let's clarify where Git stores your data. Many people assume there are just 2 places: your local machine and GitHub. In reality, Git manages your data across several locations (4) within your local repository and, optionally, a remote repository (like GitHub). Understanding these storage areas is key to mastering Git.
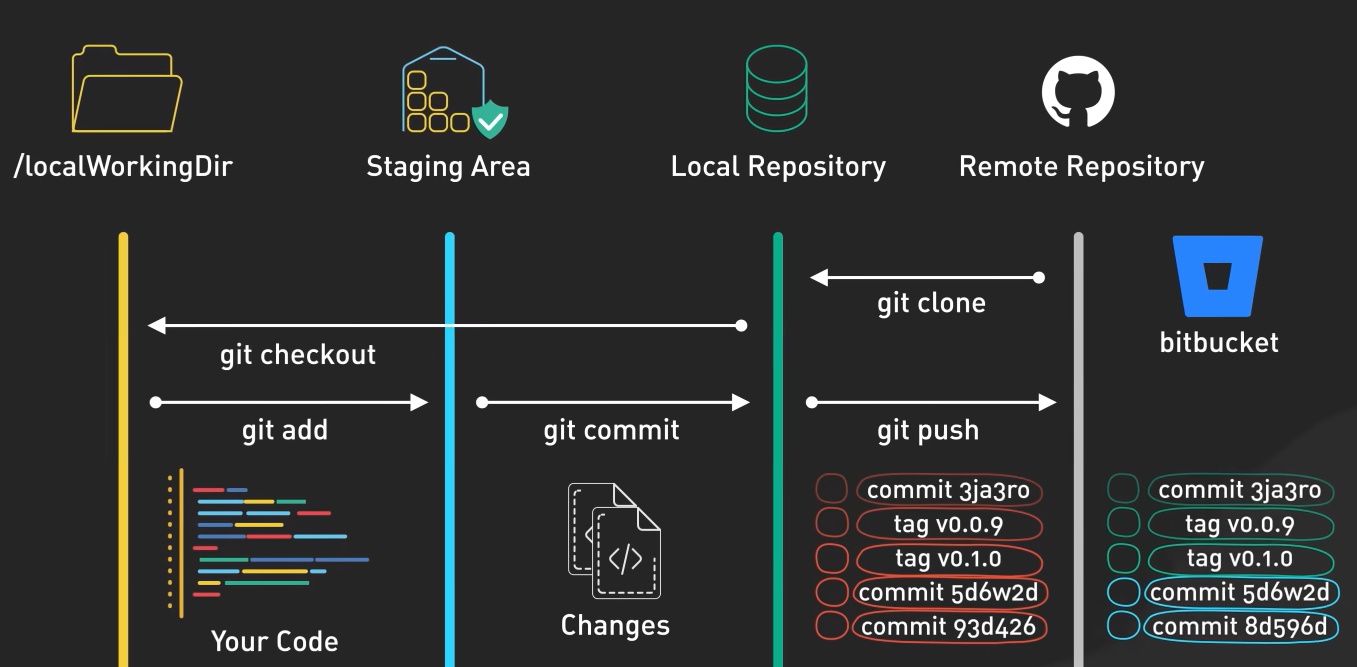
- Local Working Dir : this is our playground, our local working dir / local working tree (git terms), in which we have files and have
.gitfolder. - The Staging Area / Index : it's a temporary holding spot for changes before committing.
- Local Repo : this is where we store committed changes locally.
- Remote Repo : A server where we can store and backup our code, like Github, GitLab, BitBucket.
Key terms
Key Terms
-
repo: a git tracked project
-
commit: A point in time representing the project in its entirety. The sha that represents a commit, 40 a-f 0-9 characters, is calculated from contents of change, author, time, and more
-
index: I will use this term or staging area interchangeably. From the github blog
The Git index is a critical data structure in Git. It serves as the “staging area” between the files you have on your filesystem and your commit history. When you run git add , the files from your working directory are hashed and stored as objects in the index, leading them to be “staged changes”.
-
squash: to take several commits and turn it into one commit technically a squash would be taking N commits and turning it into N - 1 to 1 commit. but typically its N commits to 1 commit
-
work tree, working tree, main working tree: This is your git repo. This is the set of files that represent your project. Your working tree is setup by git init or git clone.
-
untracked files: this means files that are not staged for the first time (indexed) or already committed / tracked by the repo. These files are the easiest to accidentally lose work on since git does not have any information about these files.
-
indexed / staged: this is where the changes are to be committed. You must stage before you commit and you stage changes by using the git add command. see man git-add for more information
-
tracked. These are files that are already tracked by git. Now a file could be tracked AND have staged changes (changes stored in the index) ready to be committed.
-
remote: The same git repo on another computer or directory. You can accept changes from or potentially push changes too. Think github
Lets Understand Git general workflow
Most git commands move files between these 4 locations.
-
Make Local Repo: We made it with
git initcommand. -
let's add some files.
echo "README" >> README.md -
Now use this command to see status of our git repo
git status -
Add files to track with github
git add .\README.md

# to add all files inside a dir
git add .\
and again check status with
git status, we can see this file is added to our index / staging area. -
Now lets make this as a permanent change of our repo with commit. To commit our change use below command:
git commit -m "useful message about change"and now lets check status again :
git status
Congrats if it's your first commit 🎉
-
Now a common activity in git is to check history of commits in our repo to see previous commits use:
git logbut always use this with options
# graph representation with * as commit cp
git log --graph

# to show only commit shah
git log --oneline

# to show parent commit
git log --parents

# for piping output
git log --decorate

# to show commits for all branches, default to current branch only
git log --all

# n for any integer number, to show only n prv commits
git log -n

#you can combine many option, by default people use
git log --graph --oneline --decorate